Thursday 31 October 2013

Factory visit and test drive

Wow... This has been a long time in writing. I'll blame the weather, work, and illness. Almost 2 of these were actually limiting factors. All this happened about a month ago now, and I've only just got round to finishing the write up.

The GBS factory is some three and a half hours drive from my home in Southampton, so last Friday I set out at six in the morning to visit the factory and test drive the (very nearly) finished Mazda based Zero demonstrator car. This is something I have been looking forward to for a long time - a glimpse in to the future of what my car will be like when it's finished.

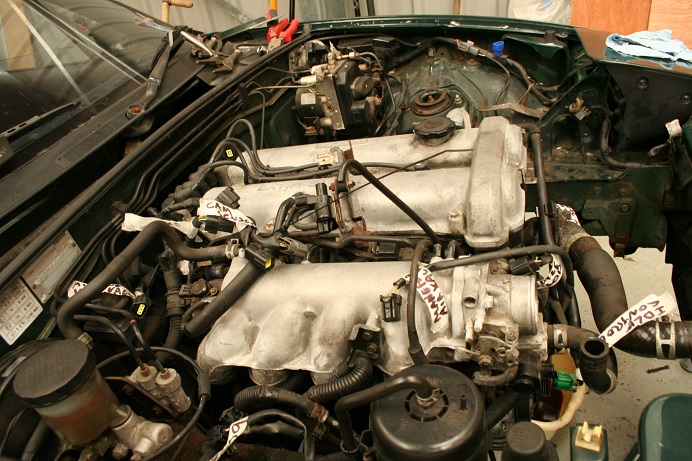
Arriving at the factory and the first sight of the car wasn't exactly what I had expected or hoped for. It seems that, during a recent track day, someone forgot to administer oil to the gearbox, which lead to the subsequent demise of said gearbox, and a very hot engine. As such the demo car was propped up on stands with the engine and a new gearbox being worked on next to it. I can't fault the GBS team for commitment here, and having said I could have a test drive that day, a test drive was exactly what they were going to provide me with, which meant fixing and refitting the engine and a new gearbox. I busied myself taking pictures of the fuel systems (next job on my car) in the cars in the workshop, and making notes of the positions of various parts and ways to fit them etc. while Keith and Rafael worked on the engine and gearbox.

Not what I was expecting

By lunchtime the engine was back in the car leaving what looked like the fairly simple job of reconnecting the water, fuel and electrics. Should be going in no time... However, a problem with the IAC meant an hour or so with a laptop working on the Emerald ECU. By this time the car was being worked on by 3 people - Richard, Keith, and Rafael, resembling a scene from a pit lane just before the race. Richard even put off another job to get the car running. By mid afternoon the car was back together and filling the workshop with exhaust fumes. Lovely.

On the road and initially it feels very much like the Zetec powered Zero, as you might expect. The exhaust note is slightly higher and the smaller 1.6 liter engine is very responsive when opening up the throttle. The engine is controlled by an Emerald ECU which has recently been tuned on the Emerald rolling road. The acceleration doesn't seem as quick as the Zetec, but it has been a while since I drove it, however just like the Zetec it just keeps accelerating faster and faster.

Cornering is every bit as much fun as I remember. The demonstrator has some specially made brakes, developed by GBS, fitted to the front, which respond instantly and give you the confidence to chuck the car round a roundabout or sharp corner knowing you can have it all back under control with a touch on the pedal. The rear brakes are the standard MX-5.

Along with the engine mapping, I know GBS have been working on the suspension set up. I am no expert but I think this car feels even more solid on the road than the Zetec powered car I drove back in February. I have gone for the slightly cheaper GAZ shocks but one thing I will make sure to do is spend some serious time and effort getting them set up properly.

Another thing I will be doing on my car is fitting some doors! They don't always look right on a seven style sports car, but the buffeting from the wind when only going moderately fast was a bit overpowering.

Factory Mazda based Zero


This was a glimpse in to the future of what my car will hopefully be like if I ever get round to finishing it. If it turns out to be half as much fun to drive as the factory demonstrator, needless to say I will be very happy...

All in all a great experience and one I would recommend anyone thinking of building a kit car go and do as soon as possible. Lastly I must say a massive thank you to GBS for not only letting me loose with the car, but putting it back together in time for me to drive it. Great work guys, no-one can say you don't put the effort in! Thank you.


Sunday 29 September 2013

Differential, Brakes, Time to catch up

Again, it's been a long time since my last post. Time for a bit of a catch up.

First part fitted to the chassis is the differential. This thing has taken the longest and been the most painful donor part to de-rust and clean up, so it's with some satisfaction that I now have it attached to the car. I had to drill 3 holes in the top bracket in line with the plate on the chassis. It sits slightly below the mounting plate and needs to be packed out with washers when fitted which made marking the holes tricky. I got it just about right and only needed to file a little bit around each one to make it fit. I may need to look at the underneath of the bracket to ensure there is enough contact between the washers and the bracket for it to be secure. Right now it is solidly on there, but i have noticed that I missed a bit when painting it - no-one could ever see it but I'll know it's there... Do I take it off and re-paint it? Or leave it on and try and forget it? I think I can forget it.


The kit contains all the suspension wishbones and associated bushes and crush tubes. Given my complete ignorance of many mechanical engineering principles prior to the start of the project, I don't mind admitting that I didn't know the real purpose of the crush tubes and had assumed that these should fit tightly in the bushes and the movement was on the bolts. Not so. The crush tubes are there to be 'crushed' into the bracket on the chassis and remain rigid while the nylon bushes rotate around them. It all make perfect sense now of course, thanks to Richard from GBS for pointing it out.

I had spent at least a day putting in all the bushes crush tubes, only to take them out again a couple of weeks later to drill out the bushes so the tubes rotated inside them. They are still a tight fit and you can't turn them by holding them with your fingers, but if they are clamped in a vice they can be seen to stay still while the bush rotates around it. Another lesson learnt, I wonder how many more there are to come.

I don't have enough room in my tiny garage to put all the suspension parts on the car just yet so they are all ready to install when I have the space. the engine and gearbox are taking up a lot of room along one side of the garage so I should think that when I get that installed I will be able to put these parts on.

Further work on the wheel hubs and uprights have now seen them painted nicely in gloss black. I am surprised how well they have come up actually, and they will look good on the car. I tried to fit a wheel bearing - WARNING: a 3 minute video on youtube is not sufficient training to undertake this sort of activity without the help of someone who knows what they are actually doing. I got one rear bearing half in before it stuck solid. I can confirm some colourful language was used at this point, along with several threats to sell everything and move to Australia. However, a local garage has kindly agreed to fix the problem and fit the other bearing properly. Nice people.

Further on and I have started fitting the brake lines. This really signifies the start of the main part of the build and it's good to see some sort of real progress at last. As lines leave the master cylinder and spread out around the chassis, the rear line needs to cross over with the front ones which is only really practical as they enter the tunnel. I have made the routing as neat as I can, but still having them cross there is a little untidy. When they are all secured down I think it should be OK. The clutch cylinder is very close to the brake cylinder so the rear line needs to route around it which makes for some interesting bends. At the recent Donnington kit car show I collared Simon from GBS to talk about how best to go about running brake lines. Turns out the tools I bought to supposedly bend brake lines neatly are not as good as gently forming the bends by hand. I have taken his advise and am very pleased with the result. Many thanks Simon.


I have just put in a big order with Kit Spares so I have shocks, fuel tank, fuel lines and other fuel system components on the way. I also went to the factory on Friday to test drive the factory built Mazda based Zero... Review of that coming in the next day or so, but suffice to say if you are thinking about buying a kit car - get up there and drive it. Your decision will probably make itself.

Sunday 11 August 2013

Getting my kit together

Again, another huge gap between posts. The past month has seen me pick up my kit, starting to put it together, working out what more parts I need, and of course buying more tools.

In recent posts I have been cleaning up and painting the Mazda parts. I have now completed the gearbox and steering / suspension parts, as well as making a start on the engine. I have a new clutch to fit which is best done with the engine and gearbox out of the car. With the impending arrival of the kit a massive tidy up operation (not my favorite activity) needed to be undertaken to ensure the chassis would fit. I think I have overdone my tool buying slightly and will probably need to find alternative storage for things like the shotblasting cabinet and air compressor. I have also sorted the remains of the Mazda in to parts I will need, parts I can sell, and parts I will chuck out.

So, lets get something to work on...

The GBS factory is some 200 miles from my home in Southampton so an early morning was called for getting me there at about 08:30 in my hired Transit. The first van I was offered by the hire company had a faulty door catch so I had to take a different slightly shorter one, causing a little worry that the chassis might not fit. Luckily it did but, to be fair, only just. I then captured Keith and Richard at GBS and quizzed them on every aspect of the factory car I could think of. They have almost completed their Mazda demonstrator which we spent some time pouring over. Just so we know what we are working towards here, here are some pictures:


A slight disappointment in that the headlight cases and front upper wishbones were missing from the kit of parts, but GBS will send them on when they are ready. I'm sure I will have enough to work on so I won't miss them yet. GBS are going to modify the prop, drive and steering shafts and send them on to me as well.

Back home and with the chassis moved to my tiny garage, and all the other parts scattered around my flat, I set to work getting to know what I had to work with. Along with the chassis and wishbones, the kit includes the nylon bushes and crush tubes, and the relevant bolts and nuts to fit them together, pedals and associated fixings, lights, and of course all the body panels.


My plan to start off the build is roughly as follows:

Fit the differential
Fit the wishbones and shocks
Fit new bearings and bushes in the rear uprights and fit them
Fit pedals and master cylinders
Install brake pipes

With everything accounted for I set to work on the differential. I have cut off the old mouthing lugs but need to drill 3 holes in the top mouthing bracket. The diff is mostly made of cast iron so it is not easy to lift up to the chassis to locate the holes. I managed to do it by positioning it on an old box and progressively adding more bits of wood underneath it to lever it up high enough. It fits nicely but I have yet to drill the holes.


Wishbones next. Inserting the nylon bushes and crush tubes was first. Bear in mind that I have not done anything like this before so I was glad to find Richard Lincoln's blog with a detailed explanation of how to do it. A bit of Copper Ease and the bench vice and I soon had the hang of it. I just needed to spend time on each one being very careful to ensure the bushes went in precisely square so not to deform them or shave off any nylon. I now need to fit the new bushes and wheel bearings in to the rear uprights and order the shock absorbers.


One aborted attempt to fit a rear wheel bearing has convinced me that this bit is difficult and I will seek advice before continuing. The new wheel bearings cost over £35 each so I don't want to trash any unnecessarily.

Looking at what I have done and the time I have had to do it in, there doesn't seem to have been much progress made. I will wheel out the excuse of a few foreign business trips taking up the time... I will have more to report soon.

Sunday 14 July 2013

Getting on with it

It's been a while since my last post on this site. The past month has seen a fair bit of work on the car (bits for it anyway), interspersed with a few foreign business trips, and nearly being made redundant from my day job. I am pleased to say that I am still gainfully employed and as such can continue to feed what is becoming a dangerously addictive habit of buying increasingly expensive tools.

The first task after getting all the parts from the Mazda back to my tiny garage was to de-rust, clean, and paint the bits I will need to attach to the kit. The menu included the differential, gearbox, hubs and brackets, and brake calipers. Prop and drive shafts need to be shortened so will be addressed when I have the chassis. I'm probably going to just clean the remains of the dirt and oil off the engine and scrub the rocker cover to make it look a little nicer. I have no desire at this stage to strip the engine down and rebuild it.

The differential was the worst affected by corrosion (see the picture on the previous post). I tried the usual wire brush and wire wheel attack but it was only really polishing the rust layer. Some rust remover chemicals were employed which were, and I'll be completely honest here, USELESS. Probably not designed for such serious corrosion. The purchase of a wire 'cup' for the angle grinder was the most effective. If I added up all the hours spent working on the diff it would run in to days of work, probably more, however it's now mostly done and looking good. I need to remove the mounting lugs and paint it.


Next up - Gearbox. Being made of alloy there was no rust but there was a bit of surface corrosion and a lot of dirt and oil to clean off. The most effective tools here were cellulose thinners and synthetic wire wool. One new tool this month was a bench grinder with a large wire wheel attachment. I removed most of the bolts in the gearbox one at a time and cleaned them on the wire wheel. The result made the finished article look almost new. I am almost impressed with what I have achieved with this, however I must give most of the credit to my brother who kindly gave up a weekend to help push the project along in return for curry and beer.

There are a few hard to reach corners that haven't cleaned completely but I have to draw a line somewhere as I seem to have been cleaning the diff and box forever. Yet to be painted, the gearbox has come up well overall.


I've mentioned previously that the underside of the Mazda had suffered badly from rust. This included the wheel hubs and brake calipers. Having spent enough time on the differential, I had no intention of trying to clean up the hubs with a wire brush - however mechanically assisted - so it looked like the best option was to remove the bearings and shot blast the parts. What I should have done at this point was find a local shotblasting place and taken everything to them. What I actually did was use this as an excuse to buy myself an air compressor and shotblasting cabinet, and clean the parts myself.


Don't get me wrong, I am pleased with my purchase. It has got the rust off the parts, provided a talking point at work, and most of all I have some cool new tools. But, and I don't say this lightly, I  actually wish I hadn't bothered. Although the cabinet is sealed with filters to let the air out and keep the grit inside, the seals can't quite cope with the pressure of the air compressor at full blast, particularly if the filters are a little blocked, and a certain amount of very fine dust is forced through. With some of the parts taking several hours to fully clean (there was a lot of rust and I am a bit of a perfectionist), and a lot of parts to do, I would end a session covered in dust, and a layer of the stuff gathering over everything in the garage. It also used so much air that the compressor was on nearly all the time. Not only was it dusty and noisy, I had to do it all with the garage door shut so not to upset the neighbors, so it was also very hot work.

If I had known all this before, I probably wouldn't have bought it. Having said that, the parts have been cleaned really well and now have a primer on them ready to to be painted which I shall do in the next week or so.


Talking of painting, The gearbox is now primed and awaiting its final coat.


And finally... I have just heard that my kit is now ready to pick up from the factory. I shall be hiring a van and driving to the East Midlands on Tuesday.

Sunday 12 May 2013

The end of the beginning

This is the final push to get all the rest of the parts off the MX-5 that I need for the Zero. This includes freeing the rear right hub, taking out the wiring loom, and seeing what other bits I can salvage and maybe list on a popular web based auction site. This whole project is still very exciting although I am getting a bit bored of working on the Mazda.

Right, time to free that rear hub from the axle. When I last worked on the car a few days ago (I am a little late in writing this) I had hit the CV joint protruding through the hub bearing with all the hammers in the workshop, and only succeeded in flattening off the end of the shaft. I clearly wasn’t going to have any more success today so I collared friendly mechanic Mick, who had arrived to take my father’s car or van for an MOT test or something less important than my hub predicament, and informed him that the hub was properly stuck and even he wouldn’t be able to shift it. This did the trick and, with the use of a 1/2 inch socket extension (many thanks to my father for this noble sacrifice) and a lump hammer, hit the shaft three times – that is THREE TIMES and only three times – and the end of the CV joint started moving out of the bearing. I could hardly believe it. I spent almost a whole afternoon on that thing and it didn’t shift a bit. Mick hits it 3 times and it does as it’s told. Unbelievable, he must think I’m useless. Anyway, it’s free now. After a consolatory “I know what you’ve been through” speech, Mick left to get on with what he was expecting to do that day.


Onwards, and with the arrival of more help in the shape of my brother – very experienced in taking cars apart and as a bonus putting them together again – we took out the dashboard and carpets to expose the wiring, and removed the loom in 3 sections from the car. The whole thing has taken up an entire storage box.


The ECU and ABS controller were neatly hidden under a metal plate in the passenger foot well which was the only thing to be held on with sheered bolts. No problem for the crowbar and I now have a full wiring loom with ECU all intact ready to be re-purposed in the Zero. In terms of electrics and particularly the ECU in the new car I think the ABS shouldn’t be a problem as the ECU will just light the fault light on the dashboard if it can’t see the ABS controller, and I don’t plan to have a ABS light on my dashboard, but there might need to be some attention given to the power steering as the ECU will increase the idle speed of the engine when the car is not moving to keep the pressure up in the system that will not be fitted on the Zero.
We also fully removed the rear right hub and freed the drive axle half shafts from the differential casing. Lastly the hood and handbrake attachments came off with little drama.


With everything required, and quite a lot not, all removed from the MX-5 it presented a sorry sight sitting on stands with no wheels or bonnet and the seats and doors dumped inside. That car had been someone’s pride and joy blah blah blah… anyway it’s just scrap now, and it's in the way of everything else so it has to go. I managed to fill the back of my small estate car with the remains of carpets, trim, dashboard, random bits of metal, and take it to the local tip – sorry – recycling centre. I was a little unsure if they would take it as there are procedures for scrapping cars involving filling in the V5 etc. which I can’t do yet as I am not getting rid of the chassis yet, but the guys at the tip didn’t seem to mind. One of them saw the cigarette lighter in the dashboard and asked if he could have it as his had broken. Fine by me, he even took all the stuff out of the car and distributed it in to the various recycling skips for me, good deal.


I’ve now moved all the parts to my tiny garage under my flat in Hampshire and from now until the kit arrives it’s a matter of cleaning and refurbishing the parts and painting them so they will last and of course look good in the kit. The differential housing, half of it being cast iron, is particularly rusty. Flakes of it just coming off whenever it’s touched. I could take it for shot blasting but this would mean stripping it down to remove all the bearings so they don’t get full of the aluminium oxide used in shot blasting essentially meaning a full rebuild of a fully working differential, so I have decided to take the manual approach and try to take the rust off with the aid of a wire brush and elbow grease. That and some wire wheel drill bits and some very nasty rust-remover chemicals. Next I will get to work on cleaning the gearbox – no rust just surface aluminium corrosion – and then the hubs – much rust.


Differential housing after only a light wire-brushing.

Whilst I have the engine and gearbox apart it makes sense to change the clutch. I am told I need a new clutch plate, thrust bearing, spigot bearing, and something else. All these I shall get and replace when I put the engine and gearbox back together.


So I have plenty to do and it’s all shaping up quite nicely as an exciting project. I hope the ebay community need some Mazda bits.

Thursday 2 May 2013

Getting started - part 2


It’s been 2 weeks since I have been able to get on with removing the rest of the bits from the Mazda, time well spent buying more tools and setting up the garage for the impending arrival of car parts and eventually a chassis to bolt them on to. It seems every trip to my local tool shop results in the purchase of far more kit than I set out to get. I was advised that a tool chest would be an asset to the workshop so went in to buy a decent but budget setup. I left with the top of the range model at over twice the price. Having said that, it is, frankly, the business.

Back to taking the car apart. On my own this time but armed with the experience of last times stuck bolt marathon, I think I am ready for it. The plan for this weekend is to take the rest of the parts I will need for the Zero off the Mazda such as the hubs, differential, steering column, brake and clutch master cylinder. If there is time, take out the wiring harness and ECU, then remove any other parts I might be able to sell on to recoup my tool chest investment. I also need to split the engine and gearbox ready to take it back home for cleaning.

Front brakes first and surprisingly the retaining bolts graciously released without argument. I got the disks and callipers off both sides in about half an hour and set about the rear wheels. A little more resistance here due to a bit more rust and slightly restricted access, but the brakes came free eventually. Now to take the hubs off. I had been following a process for removing the brakes and hubs in a manual that had been pretty much faultless up until now.

On this occasion I had not read the instructions relating to removing the hubs before actually starting the job, so one seemingly throw-away comment rang a small alarm bell – the hub is held on by a 29mm nut, as such you need a 29mm socket to undo it. Fair enough. The manual makes reference to this by telling me that this is an unusual size of socket and unlikely to be in a standard socket set. This may go down as the understatement of the project. I have spent hundreds of pounds on tools in the last few weeks, some of which I didn’t even know existed previously, but a 29mm socket was not included in my hording. The meant another visit to my favourite tool shop.
Behold. The only 29mm socket in Norwich.

It seems 29mm sockets are a bit of a rarity and presented the tool shop staff with something to think about. One assistant helpfully imparted “29 eh? That’s an odd number.” Our school system is clearly working then. Despite his brilliant education, the professor was unable to produce a 29mm socket but did offer me universal bearing puller. I really have no idea why. He suggested trying their competitor down the road. This I did but other than confirming that 29 was indeed an odd number, they too had nothing suitable. They suggested trying their competitor down the road - where I had just come from. I wasn’t playing that game and tried the only other place I could think of, a discount motor spares place apparently specialising in bicycles. Incredibly they had one, and only one, for which I gratefully parted with eight quid.

Having purchased the only 29mm socket in Norwich I headed back to the workshop to remove the hubs. The manual I am working to talks about having to use an extended handle on the socket wrench to get enough force on the nut to undo it. No problem as I have an old scaffold pole suited to this kind of thing, however, and I have checked this twice now, there is no prior mention to the need to leave the wheels and preferably the brakes attached in order loosen the hub nut. In fact this is only mentioned at the end of the list of steps as a side note at the end where the author admits it may have been better to leave the wheels on to get the nut loose. Of course this is clearly obvious now and had I thought about it a little more before starting, or if I’d done anything like this before, I would have loosened the hub nuts before starting anything wheel related. Lesson learned. Onwards.

All hub nuts were very tight which has to be good news, but all came off with little more resistance than would be expected. The scaffold pole proving a must have accessory.

With the hub nuts off it’s on to removing the hubs. According to the manual you just undo the nuts and “slip off the hubs”. This worked for both front hubs and the rear left, a good start but the rear right was not so accommodating. Memories of the hours spent freeing bolts during the last workshop session still in my mind, this hub was making that look easy. No matter how much levering it and whacking with all the hammers in the workshop (the end of the CV joint now has a flattened end that I don’t know what I am going to do about) that thing was ON THERE with no intention of going anywhere. It’s still there now as I write this. I hate leaving a job unfinished. I think it’s going to have to go to a garage and someone who knows what they are doing. Whilst this is simply all part of the deal when building this type of kit car, but it has taken a bit of the fun out of project so far.


Moving on I removed the steering column after, and very gingerly, taking the airbag out of the wheel. I’m pretty sure these things can’t go off without the battery connected but I’m not taking any chances. I also need the brake and clutch master cylinders which meant some uncomfortable upside down working in the driver side foot well to release the fastenings and label the wiring as I took it off the peddles. Although a little awkward to reach some of the bolts, all the parts came off with little argument and appear to be in good condition. Lastly I took out the passenger seat, I’d already removed the drivers, which will give a little more room to access the electrics in the passenger foot well.


While I have got done almost everything I wanted to do on this visit, it's taken longer than I wanted and I think any future projects will be unlikely to involve taking apart 17 year old Japanese sports cars…

Tuesday 16 April 2013

Getting started - part 1

Time to get started on this project. I have my Mazda MX-5 in a garage ready to be taken apart, enlisted the help of a friendly mechanic called Mick, and got the tools and a book of instructions that will lead me through the process of taking the parts off the donor car I need. Surely this couldn't be easier, what is all the fuss about?

Well... Let's start with a complete Mazda. All working, running, and actually quite fun to drive.


We started enthusiastically disconnecting the engine from it's electrical, fuel, air, and cooling ancillary components. Much of the various oils, fluids, and liquids carefully collected before it hit the floor, much of it not. My plan is to use as much of the existing MX-5 wiring loom as possible in the new car so I diligently attached pieces of masking tape with some vague reference of their function to all the electrical connections. Having read about other people trying to re-use looms in kit cars, this seems to be what they all 'wish they had done at the start'. I broke the clip on one connection which disappointed me, but if that's the worst that happens on this project, I'll take it.


All good so far. Now to lift the engine and gear box out as one unit. A few bolts holding the gearbox to the PPF (Power Plant Frame - a long metal beam running half the length of the car from the gearbox to the differential, right in the way of everything) put up a little resistance but gave way with a little persuasion. Unfortunately this PPF was so positioned as to not allow the gearbox to tilt sufficiently to enable removal with the engine. Seeing that splitting the engine and gearbox whilst under the car was a mission in itself, and would have to be done mostly by feel, the PPF had to come off.

And this is where it start to go wrong. With the 2 bolts attaching it to the gearbox removed, the only thing holding the PPF in the way was 2 bolts in to the differential casing. No kidding - one of these bolts took the two of us an hour and a half to get off. With the bolts out the thing still wouldn't come off the diff due to what looked like a stuck locating bush underneath, so we decided to take the whole differential itself off.

At this point I should say that it appears the rear of the car has suffered a little more with rust than the front. Quite a lot more in fact, and as such the differential was going nowhere. Of the 6 bolts holding it in place, 4 had so little shape to them that they had to be removed with Irwin sockets. Another 2 hours and half a can of WD40 later, the differential was detached, freeing the PPF, and we could move the gearbox. All that was now needed was to attach the engine hoist and lift out the engine and gearbox.


If things weren't already going according to plan, or at least timescale, the engine hoist had one more surprise for us. With the engine attached by its lifting points, a few pumps on the hoist's actuator handle revealed the final problem that was going to bring the day's activities to an end. Instead of the hydraulic ram neatly lifting the engine and transmission out of the engine bay, an O-ring in one of the cylinders failed and covered the floor in yet another automotive oil. Despite finding some more O-rings, almost the right size, it wasn't going to hold it's liquid, so we had to call it a day.

After an evening of analysis, planning, and mostly beer drinking, the next day saw the purchase of a shiny new engine hoist. This lifted the engine and gearbox out cleanly. I declare this project officially started.


Having not got anywhere near as far as I wanted to do on the first day of working on the project, I am obviously keen to get on taking the rest of the Mazda apart. Unfortunately due to work commitments, and having to do this part of the work some 200 miles from home, I now have a two week break before I can start work again, but I think I have a better idea of what to expect next time.

Monday 1 April 2013

Decisions

The 7 style two seat sports car is one of the most popular kit build cars around, and as such there is a lot of choice in kits to buy. Having visited a few kit car shows and obtained stacks of company brochures via the internet I narrowed my choice to a couple of companies, one being Great British Sports Cars near Newark. Their offering, the Zero, appears good value and, to my mind, has a more exciting look about it than some other cars. I like the use of the aluminium body panels with just the nose and wings in coloured GRP.

Time for a factory inspection.

I managed to pick the coldest day in February for my visit, a fact not lost on director Keith Bird who turned a worrying shade of blue during our test drive. Great British Sports Cars (GBS) is the company formed out of Robin Hood Engineering and a few other subsidiaries, and has itself seen some significant changes in the last few years. The new car, the Zero, was first released in 2007 and has been the subject of constant development since. There are 2 main chassis options, a Ford based kit which can use mostly new as well as donor parts, and the new Mazda MX-5 donor based kit. There is also a 'GT' option with a wider body. All these are exported all over the world, and there is even a dealer in America.

I met Keith in the showroom next to a part built kit and told him of my lack of automotive knowledge and aim to build a car on the tiniest budget imaginable. Undeterred, he showed me the around the kit, told me what parts are reused from the donor car, what extras would be needed, and the sort of work required by an amateur like me. The factory floor had a number of kits in various stages of build and some completed cars awaiting IVA inspection. I suspect this will prove to be one of the most useful activities in the whole process of getting a car on the road, the opportunity to see where all the various components of engine, brakes, cooling etc. fit in to the small chassis is invaluable and I would suggest this be a must do activity for anyone thinking of building a kit. Keith patiently answered my barrage of questions, then took me out for a test drive in the demonstrator car.

The demonstrator was a Ford based car with a 180hp engine and some sort of test set up on the suspension which made the ride a little lower than it would normally be. Other than that, it is the standard build anyone can make. Keith is obviously a skilled driver and drove me around the nearby roads ably demonstrating the handling and acceleration (I'll not mention any speeds we might have achieved). I haven't driven or ridden in many kit cars up until now, in fact I've only driven one quite old example, but the first thing that struck me was how solid the whole thing was. In my mind I had the idea that a kit, being built out of bits of other cars, would feel, well, thrown together. Nothing like that here, the car solidly stuck to the road, hugged the corners, responded immediately to steering, acceleration, and braking, all the time showing no sign of any 'rough and ready' feel.

Impressed, and by now nearly frozen solid (it had actually started to snow at one point), we retreated inside for a cup of tea and look around the workshop. GBS make a lot of components for things like suspension themselves using some very cool CNC machines, rather than buying off-the-shelf or having them made specially by external companies. Keith explained this gives them better control over the quality and availability of the parts as well as the freedom to try different ideas as designs evolve.

After a very useful and informative couple of hours I thanked Keith and headed home with a lot to think about. GBS are located some 200 miles from my house in Southampton, but I don't think this will be a problem as I was promised support via email, telephone etc. I needed to think more about the cost as my original budget of around £6k would probably not give me the sort of finish I would ideally like.

So, a few email exchanges later in which Keith gave me a helpful realistic guide to the likely overall costs, and having found myself a 1996 MX-5 to take apart, I placed the order for the kit. With a few essential extras included, such as the powder coating and lowered floor, as well as the new sport front wings, I parted with the deposit. I now have 6 to 10 weeks to clear the garage, take the bits off the Mazda I want, and, most importantly, buy the sort of garage tools that even I need a reason to part with cash for.

So that's it, no going back now. I've got my donor car, ordered the kit, promised myself I'll tidy the garage, I can't wait to get started.

Saturday 30 March 2013

First words...

Greetings,

This is planned to be an on-line diary of my latest project - the building of a 2 seat Lotus 7 style kit sports car.

After much deliberation I have decided to go for the "Zero" made by Great British Sports Cars near Newark, England. It has an exciting, more aggressive, serious fun look and feel about it than other cars I considered  It's also very good value and I was impressed with the factory setup when I visited. I'm building the new Mazda donor based kit and have recently acquired a very tidy 1996 1.8l MX-5 for the job.

Please remember any views expressed are my own, and whilst I’ll make every effort to ensure the contents of every post is factually accurate I take no responsibility for loss or damage to anyone or anything acting on anything written here.

Further posts as I make progress, or lack of. Comments and questions welcome.

Jon.